

Step by step: How to set up a VPN in Windows 10
Step 1
Click on the Cortana search bar or button on the taskbar and type vpn.
Step 2
The top choice should be Change virtual private networks (VPN). Alternatively, open the Settings app and go to Network & Internet > VPN.
Step 3
At the top of the VPN screen in the Settings app, click Add a VPN connection.
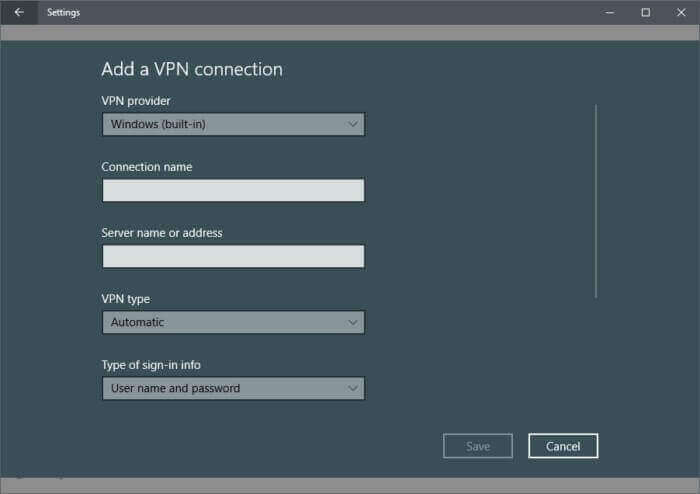
Step 4
In the screen that appears, enter the details for your VPN connection. Under “VPN provider” click on the drop-down menu, and select Windows (built-in). This will also change “VPN type” to Automatic, and “Type of sign-in info” to User name and password.
Step 5
Next fill out the “Connection name” and “Server name or address.” These vary based on your VPN provider—whether a third-party service or an employer. For this example, we’re using Acevpn, a clientless VPN service that supports various connection types such as IKEv2, L2TP, and PPTP.
Step 6
Scroll down this screen and you’ll see a spot to enter your username and password for the VPN—again provided by your VPN service. Once the information is entered, click Save, and close the Settings app.
Step 7
Click the Wi-Fi icon in the system tray on your taskbar, and select your newly created VPN connection, which should be right at the top of the list. It should automatically start to connect, and if all goes well the connection process should happen relatively quickly.
The above process works for simpler forms of VPN connections such as PPTP and L2TP but if you want to use IKEv2 that allows your VPN provider to install a root certificate. Keep in mind that not every service supports IKEv2 so it depends heavily on your VPN service provider or employer using that process.
No matter what, here is how it works on Windows 10.
First, download your VPN provider’s IKEv2 certificate to your desktop or somewhere else that’s convenient. Next, double-click on the certificate file and a security warning pops-up. Click Open.
On the next window that opens click Install certificate…
Now we’ve arrived at the Certificate Import Wizard. Select the Local Machine radio button and click Next.
On the next screen make sure to select the radio button labeled Place all certificates in the following store, and click Browse…
A smaller window opens with a folder tree. Select Trusted Root Certification Authorities and then click OK. Now we’re back at the Certificate Import Wizard window. From here click Next.
The hard part is over. On the next screen click Finish and then OK in the smaller window.
Now that we have activated the certificate we can set up the IKEv2 VPN using the same step-by-step instructions above. Just make sure you pick IKEv2 under “VPN form,” and then use your service provider’s server name, address, and username and password.
Once you’ve logged in to the VPN, check by visiting IPleak.net to see that your VPN is working. You should see an IP address, and specific DNS servers than your non-VPN state. If you don’t, then there are a number of possible reasons we can’t go into here. Your best bet is to consult with your company’s IP department or your VPN support service.
However, one easy and common fix for IKEv2 problems is to right-click on your Wi-Fi or ethernet icon in the system tray, and select Open Network and Sharing Center from the context menu. When the Control Panel opens click Change adapter settings on the left side, then right-click the name of your VPN connection and go to Properties > Internet Protocol Version 4 (TCP/IPv4) > Properties > Advanced… > IP Settings. Check “Use default gateway on remote network” and click OK. Close up all the windows and try IP Leak again.


