

Step 1: Generate Private/Public Key pair on your local computer
Start the PuTTy key generator on your computer to create the 2048 bit RSA key. Click the’ Generate ‘ button. In order to generate hard-to-sensitive values, you will need to move the key area randomly.
Proceed with the movements until the keys are generated as shown on the image below.
Enter a value on the Key passphrase field to protect your private key with a password.
Enter the username associated with the key on the Key Comment field, e.g. james as shown below:
Your public key is now ready for pasting. You will need to copy paste the value and store it in a text editor like notepad for future reference.
Also, click on the Save Private Key to store your private key on your local computer and give it a descriptive file name e.g. private_key_james .
Step 2: Copy The Public Key From Your Local Computer To Your Virtual Private Server
Our public can be copied to our Ubuntu remote server now. Sign in to your Ubuntu server with your user’s credentials for which the private / public key will be generated.
Create a directory to store the public key using the commands below:
|
Then, open the authorized_keys file for editing using a nano editor by typing the commands below:
|
Then copy paste the public key that we generated above to the text editor and press CTRL+X and Y to save the changes.
Step 3: Change the Permissions for The Authorized Key Directory and File
Change the directory permissions using the command below to avoid other users on the Virtual Private Server from accessing the private key file:
|
Step 4: Disable Password Authentication on SSH
Follow up and deactivate SSH Password Authentication after you build the private and public key and copied the latter on your Virtual Private Server. This ensures that nobody can log in via a username or password combination to the server.
To do this open the SSH Configuration File using a Nano editor with the command below:
|
Find a directive written PasswordAuthentication and change its value to No.
|
|
Restart SSH by typing the command below:
If a user tries to log on to the server with a username and a password, they are going to get this error
No supported authentication methods available (server sent: publickey)
Step 5: Log on to your server using the private key you created above
You can now log on to your server using the private key you created above. If you are using Putty, enter your Virtual Private Server IP address under Host Name (or IP address) as shown below.
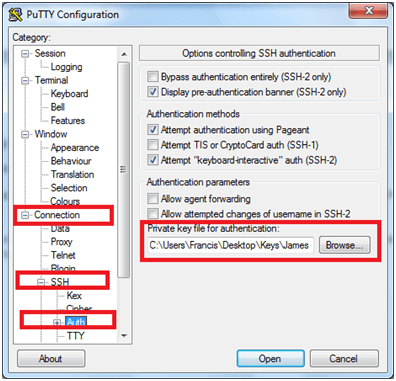
Then, click on Connections – > SSH -> Auth from the left pane tree view as shown below and select the private key you created above under Private key file for authentication.
To link to your Virtual Private Server, press Open. Every time, instead of using the usual password, it’s up to you to enter your passphrase when creating a public / private key pair. Nonetheless, the username needs to be entered as usual. You would successfully sign on to your server if you followed all the steps above.


