

BIOS and UEFI
BIOS is a type of firmware stored on a chip of your motherboard and stands for “Basic Input / Output System” The BIOS boots on machines when you start your computer and configures your hardware until you switch them to a boot system (usually the hard drive).
“Unified Extensible Firmware Interface,” UEFI stands for The current BIOS is the successor. UEFI supports boot volumes over 2 TB, supports more than 4 partitions on a disk, boots faster and allows more modern functions. Secure Boot, for example, can only be supported in root kits by systems with UEFI firmware.
In most situations, it does not matter whether your computer has a BIOS or UEFI firmware. Both are low-level software that boots and sets things up when you boot your PC. Both interfaces offer a number of system settings that you can access. You can e.g. change your boot order, tweak overclock options, lock your computer with a boot password, enable hardware support for virtualization and tweak other low level features.
How to Access Your BIOS or UEFI Firmware Settings
The BIOS or UEFI firmware settings screen is accessed through an entirely different process. You’re going to have to reboot your PC anyway.
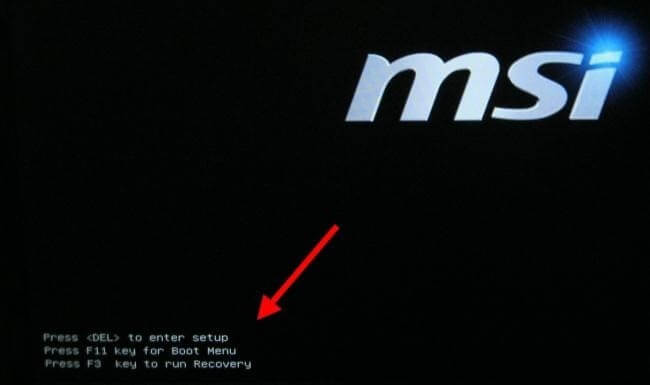
You must press a key in the boot process to access your BIOS. The “press F2 for accessing the BIOS” code, “press < DEL > to enter the configuration,” or anything like it, is shown often during the boot process. Delete, F1, F2, and Escape may be the common keys that you may have to press.
Many UEFI firmware computers allow you to press one of those keys to access the UEFI firmware settings screen during the boot-up process. Please consult your PC’s manual for the exact key to press. Consult the manual for your motherboard if you have built your own PC.
You can have access to UEFI settings screen on PCs shipped with Windows 8 or 10 through Windows 8 or 10 boot menus. To access it, hold down the Shift key while clicking the “Restart” option.
The computer will reboot into a special boot options menu. Select Troubleshoot > Advanced Options > UEFI Firmware Settings to access the UEFI firmware settings screen.
How to Change BIOS or UEFI Firmware Settings
On different PC models the current BIOS or UEFI settings screen looks different. BIOS PCs will have a text mode interface that you can use your arrow keys to navigate through the Enter key to choose options. On the bottom of the screen you will see the keys you can use.
Many modern UEFI PCs provide a mouse / keyboard interface, but many PCs also still use text mode interfaces with UEFI.
Anything that is projected on the screen can be used to use the keyboard or mouse. But take care on your settings screen of BIOS or UEFI! Only if you know what they do should you change the settings. You can make your system unstable or damage your hardware, particularly by changing some overclocking settings.
Certain settings are less harmful than others. It’s less risky to modify your boot order, but you might even have problems with it. You do not boot Windows (or anything you have installed on any operating system) until you have fixed your boot order when you change your boot order and remove your hard disk from the booting device list.
Take a look around and find what you want. Even if you know what you want, on the various computer settings screens, you can find it in another location. In general, you will see aid information on your phone, which offers more clarity on what each option does.
In the following panel “System Setup” is often use for the option to allow Intel’s VT-x virtualization technology under a Chipset menu. The option is call’ Virtualization Techniques’ on this PC, but instead is call’ Intel Virtualization Technology’ instead,’ Intel VT-x,” Virtualization Extensions,’ or’ Vanderpool.’
If you can’t find the choice in your BIOS, check your PC’s manual or support page. If you have your own computer created, check your motherboard manual or help website.
Select the option “Save changes” to save and restart your computer when finished. You can also choose “Discard Changes” to restart your PC without any changes you have made.
You could go back to your BEIGHT or UEFI firmware settings screen and use an option called’ Default reset’ or’ Load Setup Defaults’ after making a change. This choice resets all your changes by default on your computer’s BIOS and/or UEFI settings.


